Showing posts with label sewing. Show all posts

Tuesday, January 22, 2013

doing stuff

I gave myself a bit of a mental shake the other day and decided to get in and DO some of the things I had been THINKING about doing for ages (you know those jobs you think will be tricky/time consuming/brain numbing)

I had the material, and laid in bed thinking about the how that morning, and then decided to DO, and give this old chair a badly needed facelift.

imageI wouldn't say its professional by any means (I had to use calico on the bottom of the cushion) , but it IS done and I have a few mental notes about the next two I have to do...because once you start, you can't have one looking all smicko and the rest all sad and dowdy.

Instead of tackling another armchair, today I decided to do the "easier" cane tub chair that needed a new cover as well. I fell in love with this fabric at spotlight the other day. I think I need to get some more.

 imageEagle eyed people will note that the fabric is cut the wrong way...I think the vine should run UP instead of across...my fault for not paying enough attention at the first cut.  I've also just hosed the chair down and tomorrow will give it a nice coat or two of tung oil (I was going to stain it but don't have the stain, so why wait for something that isn't essential!)

The second armchair, which forms a pair with the first, will be covered in the same bright, rather garish fabric as the first (but I kinda like it a lot?!) and the third, which sits inside by the fire...I am not sure. I could use the blue/grey/navy which I love and it looks awesome, or perhaps wait and find something alternate but equally as awesome....oh decisions decisions!

Sunday, January 20, 2013

something else I made

The other day, when it was pretty darned hot outside, and the aircon inside the office, and what I very tongue in cheek call my studio, was nice and icy (set a fair way below the recommended 25 degrees!) the kids and I pottered about.

One of the things I did was make this little nappy wallet for a newly born little Isabelle.

IMG_0520She'll be quite the little cowgirl and mum and dad have already got a pony lined up for the when the time comes. (heaven help them if she doesn't like horses!) Wipes in one side, a tube of bum cream and a few nappies, the new mum has reported that it works well and meant the big old nappy bag could be left in the car.

IMG_0663Secured shut with an elastic band (hairtie in a former life) and a button I think I took off one of the girls stained play shirts (it didn't need such a pretty button) it folds up neatly. I love the outside paisley sort of print..I think I'd wear a collared button up shirt in this if someone made one!

This used three fat quarters with a fair sized scrap of each left over. And took probably under an hour to make (less if you don't faff about or make any mistakes!)

and I made this with part of the leftovers:

IMG_1787

Thursday, May 24, 2012

don't look too close

I've been sewing. My mum professed a need for a new table runner, as the one currently on her very large silky oak dining table was covered in a lovely Christmas tree pattern. So I went home and whipped one up.

The top came together so easily, I started to get an idea that I wouldn't mind making one of these for myself.

Then came the binding, and whether it be my sewing machine or more likely, my dodgy sewing skills, I suddenly changed my mind. Anyhow, it is done and will look lovely on that big table, as long as one doesn't get too up close and personal with the wretched binding.

IMG_3783It certainly is bright, but its a big table and so the "white space" all around will quieten it down. (I hope!)

IMG_3785  And I think I am SO clever. Mitred corners are not something that I have ever been able to understand (I know what they are just struggle with the HOW they happen part) and rather than waiting for someone to come along and show me, I came up with a solution. Rounded corners. They work just as well in sewing as scrapbooking ;-)

If I did it again, I think I would have three wider strips instead of just two, but that's just me being nit picky.

IMG_3782Hope she likes it.

Monday, February 6, 2012

thank goodness

they are done.

IMG_0144Curse those curvey rounded letters.

 IMG_0145I intended to have the wonky stitched look all along.

And you might notice that I simplified the process somewhat by the time I started on #3, with much dragging of heels and sighing, with a when-is-mine-going-to-be-done little girl looking over my shoulder.

IMG_0146  IMG_0147 My MIL made me some terribly comfortable maternity pants out of that purple star fabric, when I was pregnant with Angus? or maybe Georgie? I chose the fabric...what can I say, I have no defence over the fashion choices I made at that time. I think it was influenced by the Country Belle catalogue, which featured heavily on floral and patterned fabrics for skirts and capri pants. I guess it didn't look too bad, teamed with a lavender linen maternity blouse I had. You certainly wouldn't have missed me that is for sure! Luckily, I have no photographic proof of this little fashion adventure...I admit that there are only three photos of me pregnant with ANY child, that I know of in existence (all taken on someone else's camera)  I am a bit sad about that now.

Anyhow, I digress, the bags are finished and off to school tomorrow they go!

Friday, February 3, 2012

one down

one of those projects that has made me wonder what sort of insanity prompted me to not only contemplate this in the first place, but actually START it, and hence need to finish it. And then again. And again.

I'm blaming pinterest myself!  Anyhow, let me present library bag number one. I started with the oldest child. The one with the shortest name, and the one with the least amount of curly bendy letters in her name.

The library bag is a plain pre made calico bag from school, and in my fit of pinterest derived delirium, I decided that instead of just their name on the front in Nikko pen, I would instead beautifully appliqué their names on the front and add some cute embellishments. Snort.

IMG_0071 I got as far as the name and figured that was enough thank you very much, but once fiddling with the drawstring bag realised that it would be so much more practical with handles. So with some strips of precut fabric, quickly made some handles for the bag, did some rough measurements and sewed them on below the drawstring so that it is still functional.

IMG_0072I believe this is as close to the stitching that you need to get! (the letters are all the same size, the fabric is folded a bit in the image above.)

IMG_0073And the straps aren't the same either, but I tell myself it adds a little fun to the whole thing. It has to LOOK more fun than it was to DO surely?!

Am working on the boys at the moment, the child with the second shortest name, and I will be telling everyone that wonky was the look I was aiming for!

Poor Georgie, with the long, curved lettered name. I wonder if she would be happy with a big G instead?!!

Watch this space.

Wednesday, August 17, 2011

its gone into shock

my poor sewing machine!

IMG_9214 Not actually what I really planned to make, but turned out handily non-the-less. Another failure  - or two - that at least are still useful! (like most of my projects, the intended purpose has to be adjusted due to lack of cleverness or sewing skill on my part!)

IMG_9209

IMG_9212  IMG_9205

The spotty phone pouch was actually the pink and brown one on the right, until I turned it inside out...I do love the paler fabric, but my phone fits so much better into the inside out version!

IMG_9213

And I love the lining of the one that ended up being the perfect size for my little handbag camera. Tis a pity that some of the seams don't line up, but my camera doesn't care, and its a bit 'o pretty for my bag.

I've got a couple of other things to share - I told you my sewing machine has gone into shock! but I have to wait for my lovely friend Juliane to let me know when she gets them in the mail - I don't want to spoil the surprise...(the same one that said - no pressure - but I have your blog as my home page!)

Over at Simple Aussie Girls we are sharing our Week In The Live albums, so do pop over and check them out. Love each variation, and seeing a bit of everyone's different everyday-ness. Very cool.

Friday, August 12, 2011

following through

Remember this post just a few days ago? well I got my act together and actually MADE it. Instead of just finding the tutorial and pinning it! ;-)

Meet Owlee (I just know that will be the original name it will be given, and she is clearly a girl) who is waiting, hiding, for a little girls' birthday in about 15 more sleeps. Not that she is counting or anything.

IMG_9198

I think she might need a touch more stuffing, and needs her bottom sewing shut, but she is essentially done. I had to race to get her finished before school finished, as I didn't want any curious girlie looking over my shoulder (just goes to show, I should have gotten off the computer earlier!) Not perfect by ANY means, but still cute. Well I think. ( I decided to go with out the feet at the bottom)

Hope she likes her!

Link HERE if you want to make your own!

Tuesday, July 12, 2011

a change of pace

I was feeling like tinkering with my sewing machine and fabric the other day, instead of paper and glue (or even instead of folding washing or cobwebbing) so I started with a simple project for that still un born baby girl.

_MG_7161A burp cloth - some pretty fabric on top and some chenille/towelling stuff on the back. Just a bit nicer than an old cloth nappy slung over the shoulder, yes? especially for outings with baby. I've got a couple of more on the go, and they take very little time and thought to put together. And are very pretty all stacked up together! Feels nice to create a gift that is (hopefully) useful, instead of buying something from the shop, or even from the likes of madeit dot com, that someone else has made.

Something that did take more time, and more thought for this rusty at sewing brain, involved a slight miscalculation that changed the intended purpose of this next little creation.

_MG_7168

Which ended up being a rather great miscalculation - a little, padded wallet thingy for the big girl to keep all of her electronic gadgets all in the one spot - especially for in the car!  A pocket for the mp3 player, one for the DS, and another pocket for any extra games that she might wish to take (if she had any more than three games of course, but that day will come I am sure!) The two pockets on the left have little clips to shut them so mp3 players don't fall out and total devastation occur because it has been lost ;-)

_MG_7165I pinched one of the girls hair ties to turn into a fastener, and a firmly attached button to keep it all together. All in all, it ended up being a success, and of course will probably have to make at least two more as the other kids eventually get their own gadgets.(am also thinking could be a great gift idea for the cousins as well! in suitable boy or girl fabrics as the case may be) Our recent trip to the city WITHOUT this wallet proved that it really is needed to keep these valuable little toys safely in one spot, instead of floating around on the floor or on the seat under a bum.

Hoping I get some time to run up some more simple little sewing projects, but this week isn't looking good for that so far!

Saturday, April 30, 2011

being creative AND domestic

Tomorrow we are Goin' Fishin' at a Super Special Secret Fishing Hole, and ordinarily I would be in bed already, as I have to get up early to prepare for this day out, and put a hearty casserole on in the slow cooker to be waiting for us - and a few of our friends - when we get home. But my plans have been foiled - the water is out and I can't bear to go to bed stinky, so instead I am here with you, waiting for the blessed moment for the pump to have enough water in the tank and I can have a shower.

Living in small towns have their downsides. but don't get me started on that.

ANYHOW: I have been both a little crafty and domestic this week. Not domestic in the cleaning sense, lest you think I've undertaken a personality change! ;-) Our school teacher celebrated a birthday early in the week, and I drew the short straw (or rather she did) and I had to bake her cake.

We all know my successes at cake decorating. This one was not much better.

_MG_6397Let me just say I had no imagination or brilliant ideas, so just made a plain old butter cake (which wasn't as brown on the outside as the photo suggests) dumped on some butter icing (that I tried flavouring with jelly crystals for fun. Fail, no change in taste what so ever). And the butterflies are hovering over a field of flowers, should you be wondering. I knew you would be.

So, cake done, I had to find/make a gift. I decided to not go into that cupboard in the spare room, and instead to get crafty. Made this:
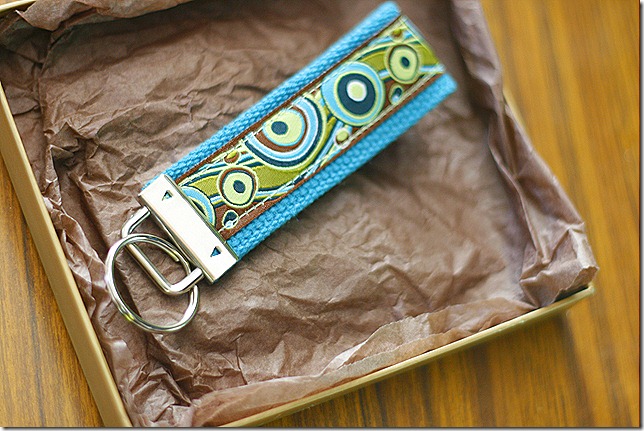
_MG_6393(its a key ring/fob/thingy)

And this:

_MG_6396(its a glass tile pendant).

I had bought the bits and bobs to make both of these things some time ago, and am quite pleased with how they turned out. A couple of little things that could be improved on, but that is just me being picky at my own work, and I don't think they look too dodgy, unlike the cake. I think, anyhow. I am thinking of doing one of each for myself actually. (I was annoyed with myself that I cut the pattern off centre, but now I think I like it this way better.)

Be back in a day or so with our fishing adventures.  I am packing a full esky, as I have no intention of relying on the fishermen for lunch. (not that I like fresh water fish in any case!)   

Thursday, March 3, 2011

Designer or Dodgy?

It's could go either way - I am not sure!  Whichever, I am pleased that I achieved what I set out to do - and have been planning to do for some time - which was turn an adults skirt into a girls dress.

I searched for a tutorial on how to make the dress "pillowcase"style, but couldn't find anything close. So I winged it. Perhaps it looks it?  I'm not sure, flushed with the success of having a finished project that I am! (and notice the child admiring herself in the glass doors opposite her...it has started already!)

1 So, I started with this:  a size 8 woman's skirt from the salvos, cost me $2.50.  A slight a-line shape to it, with a nice girly ruffle at the bottom. Pretty, romantic fabric, yes?_MG_5947 After thinking about it, I went and found a dress that fits the girl in question, and traced around the armhole. Made me a pattern - for "next time"! ;-)_MG_5953 (2)Deep breath, and cut.  And I stopped taking photos there, as I had to use my brain and it hurt a tiny bit...the skirt was lined with a lovely light lawn, and after the thinking, I was able to make the armholes nice and neat by sewing the lining and dress together.  There was more thinking and a wee bit of unpicking involved as well, as I decided to use the waistband of the skirt to thread the ribbon through for straps.  And that then required a bit more thinking as there is a zip in the back of that there skirt.  And then the search for enough wide ribbon for the straps (lets say supply is now exhausted).

But I got done, just as the big girl came home from school to try on her new dress.

2 4Now here is where you come in dear readers:  is this a creation that is successful enough for a public outing, with neater hair and nice big flower clip or pretty headband?  Or should we just keep it at home for a nightie or play dress (possibly just a nightie, knowing how the play clothes are mistreated around here!).

Let me know your thoughts, before I embarrass the child and make her wear this in public!

Monday, February 28, 2011

That little bit of sewing

Remember I did some sewing the other day, and whipped up a cover my new toy (silhouette cutter).

Made one for my sister in law's birthday, which has now passed so I can share it here - I didn't want to spoil the surprise in case she happened to read my blog.

_MG_5810I guess I could have ironed it. ;-) I have a heap of tulle pom pom things that came on a hand me down shirt (god awful!) for the girls, which I cut up - singly they are very cute, so I stitched one on to show which was the front of the cover.

And for the sewing purists:  I couldn't find any black cotton.  I used a blue that matched the blue flowers on the fabric - which is real, old, proper retro fabric, that came from my mother's cupboard, and before that I think that it was in my grandmothers - destined for a house dress or something?!  (she died when I was six, some thirty years ago, so who knows just how long that fabric has been around!)

Man, sometimes I feel old, especially when I can say:  thirty years ago, when I was.... sigh.

Monday, October 18, 2010

Finding ideas for some more sewing

Following the "success" of the pencil roll, I now want to make a simple drawstring bag to house all of the bits and pieces that go with our niece's pencil roll. But its gotta be pretty, right?!

Hanan'sDrawstringBag2 I like this idea, matching fabric.  I don't have anything nearly as cute in my pile, but I am sure I can come up with something.

With the bag plan sorted out, I thought I might like to add a little flower or something. Like this...

854cbfb52D8e2d2D40012D82682D04ab521f8209IMG5F1992 a528d5002Dcc232D4ec22Db5602De56c0753e074Floweebut I like this circle embellishment better.

Some more things that I found on my search for inspiration:

81d4906f2Da4002D4f972D968d2Da8fd5d919dbeIMG5Fr  CUTE headband!  And looks simple enough to make - here is a close up: (it has elastic at the back)

8823e6232D77032D45982D90d02D610dcd1d9120IMG5FrNow I am not sure that I am ready to venture into more sophisticated sewing like this yet ;-) - I best get through the drawstring bag first!

OOOH! Another idea that I could easily adapt to string across a bag!  cut some rough triangle shapes and then just pin them on and stitch down!  Leave the ends flapping and raw for interest. Hmm...what to do - circles or bunting? Decisions, decisions.....

510fccf02D84b92D48042D9b6b2D0cb99190fef8DSC07577a

Saturday, October 16, 2010

HURRAH!

I did it - I finally sewed something! With my sewing machine (other than paper that is).  The Grumpy One (aka The Husband) was home today and I got him to help me oil the sewing machine. It now no longer sounds like a chaff cutter.

I mentioned that I wanted to make a pencil roll, so once the machine was oiled and other piles of mess in the office/craft room (one could call it The Studio I suppose!) were dealt with,  I had a go. Completely winged it, followed no pattern except what I had seen from images gathered from around the web.

I decided to be lazy and use felt - no turning of seams!

035 I did remember reading that felt would stretch and to use ribbon or something to give some strength to the top edge.  I used some wide-ish pink ribbon.  I roughly pinned a couple of crayons into place to work out my spacings, then pinned and sewed the green bit to the flower bit.  Then I sewed that bit to the front, around the edge, and then the spotty ribbon to hold the roll together.

039 Considering this is the first real sewing project I've done in about a gazillion years, it didn't take long - maybe 40 minutes?  Its not perfect, but good enough that I feel happy to give it away to our little neice for Christmas (so Suzi, if you read this please pretend to be VERY surprised when she opens this come Christmas!)

The crayons I have used are BIC brand and are called Plastidecor - they are just lovely to use and claim to be "extra clean" (I bought mine from Woollies). My kids have used them before and they are brilliant for colouring in ordinary old recycled paper colouring books.

Now, I best go and check that my sewing machine has gotten over the shock of being used!

Other posts you might like...

Related Posts Plugin for WordPress, Blogger...